Untamed Wildlife Footage
The Heart of Wild Behavior
To understand the true nature of a species, we must first seek out the places where its behaviors remain untamed, where the human footprint is almost nonexistent. This means venturing far beyond the reach of ATVs, 4WDs, livestock, homes, roads, and well-trodden trails. These are the environments where wildlife hasn’t been shaped or influenced by human activity. They exist in the remote, untouched corners of our planet, the places that demand time, patience, and respect to access.
For me, the journey begins with Google Earth. I use it as a tool to scout these wild, untouched spaces, areas that offer not only solitude but also a window into the raw, unscripted behavior of animals. These are the places where you’ll observe species in their truest form, without the distractions or manipulations of human presence.
It’s here, in these wild places, that you’ll learn the real stories of an animal, its daily struggles, its natural instincts, and its vital role in the ecosystem. It’s in these environments that we can see the true scope of their impact on their surroundings, as well as the complex interactions they have with other wildlife. Without the interference of human activity, we are granted a rare, unfiltered view of nature in its most authentic state.
This is the essence of what I do at Wild Nature Media, filming the wild, untamed behaviors that define our planet’s most extraordinary creatures.
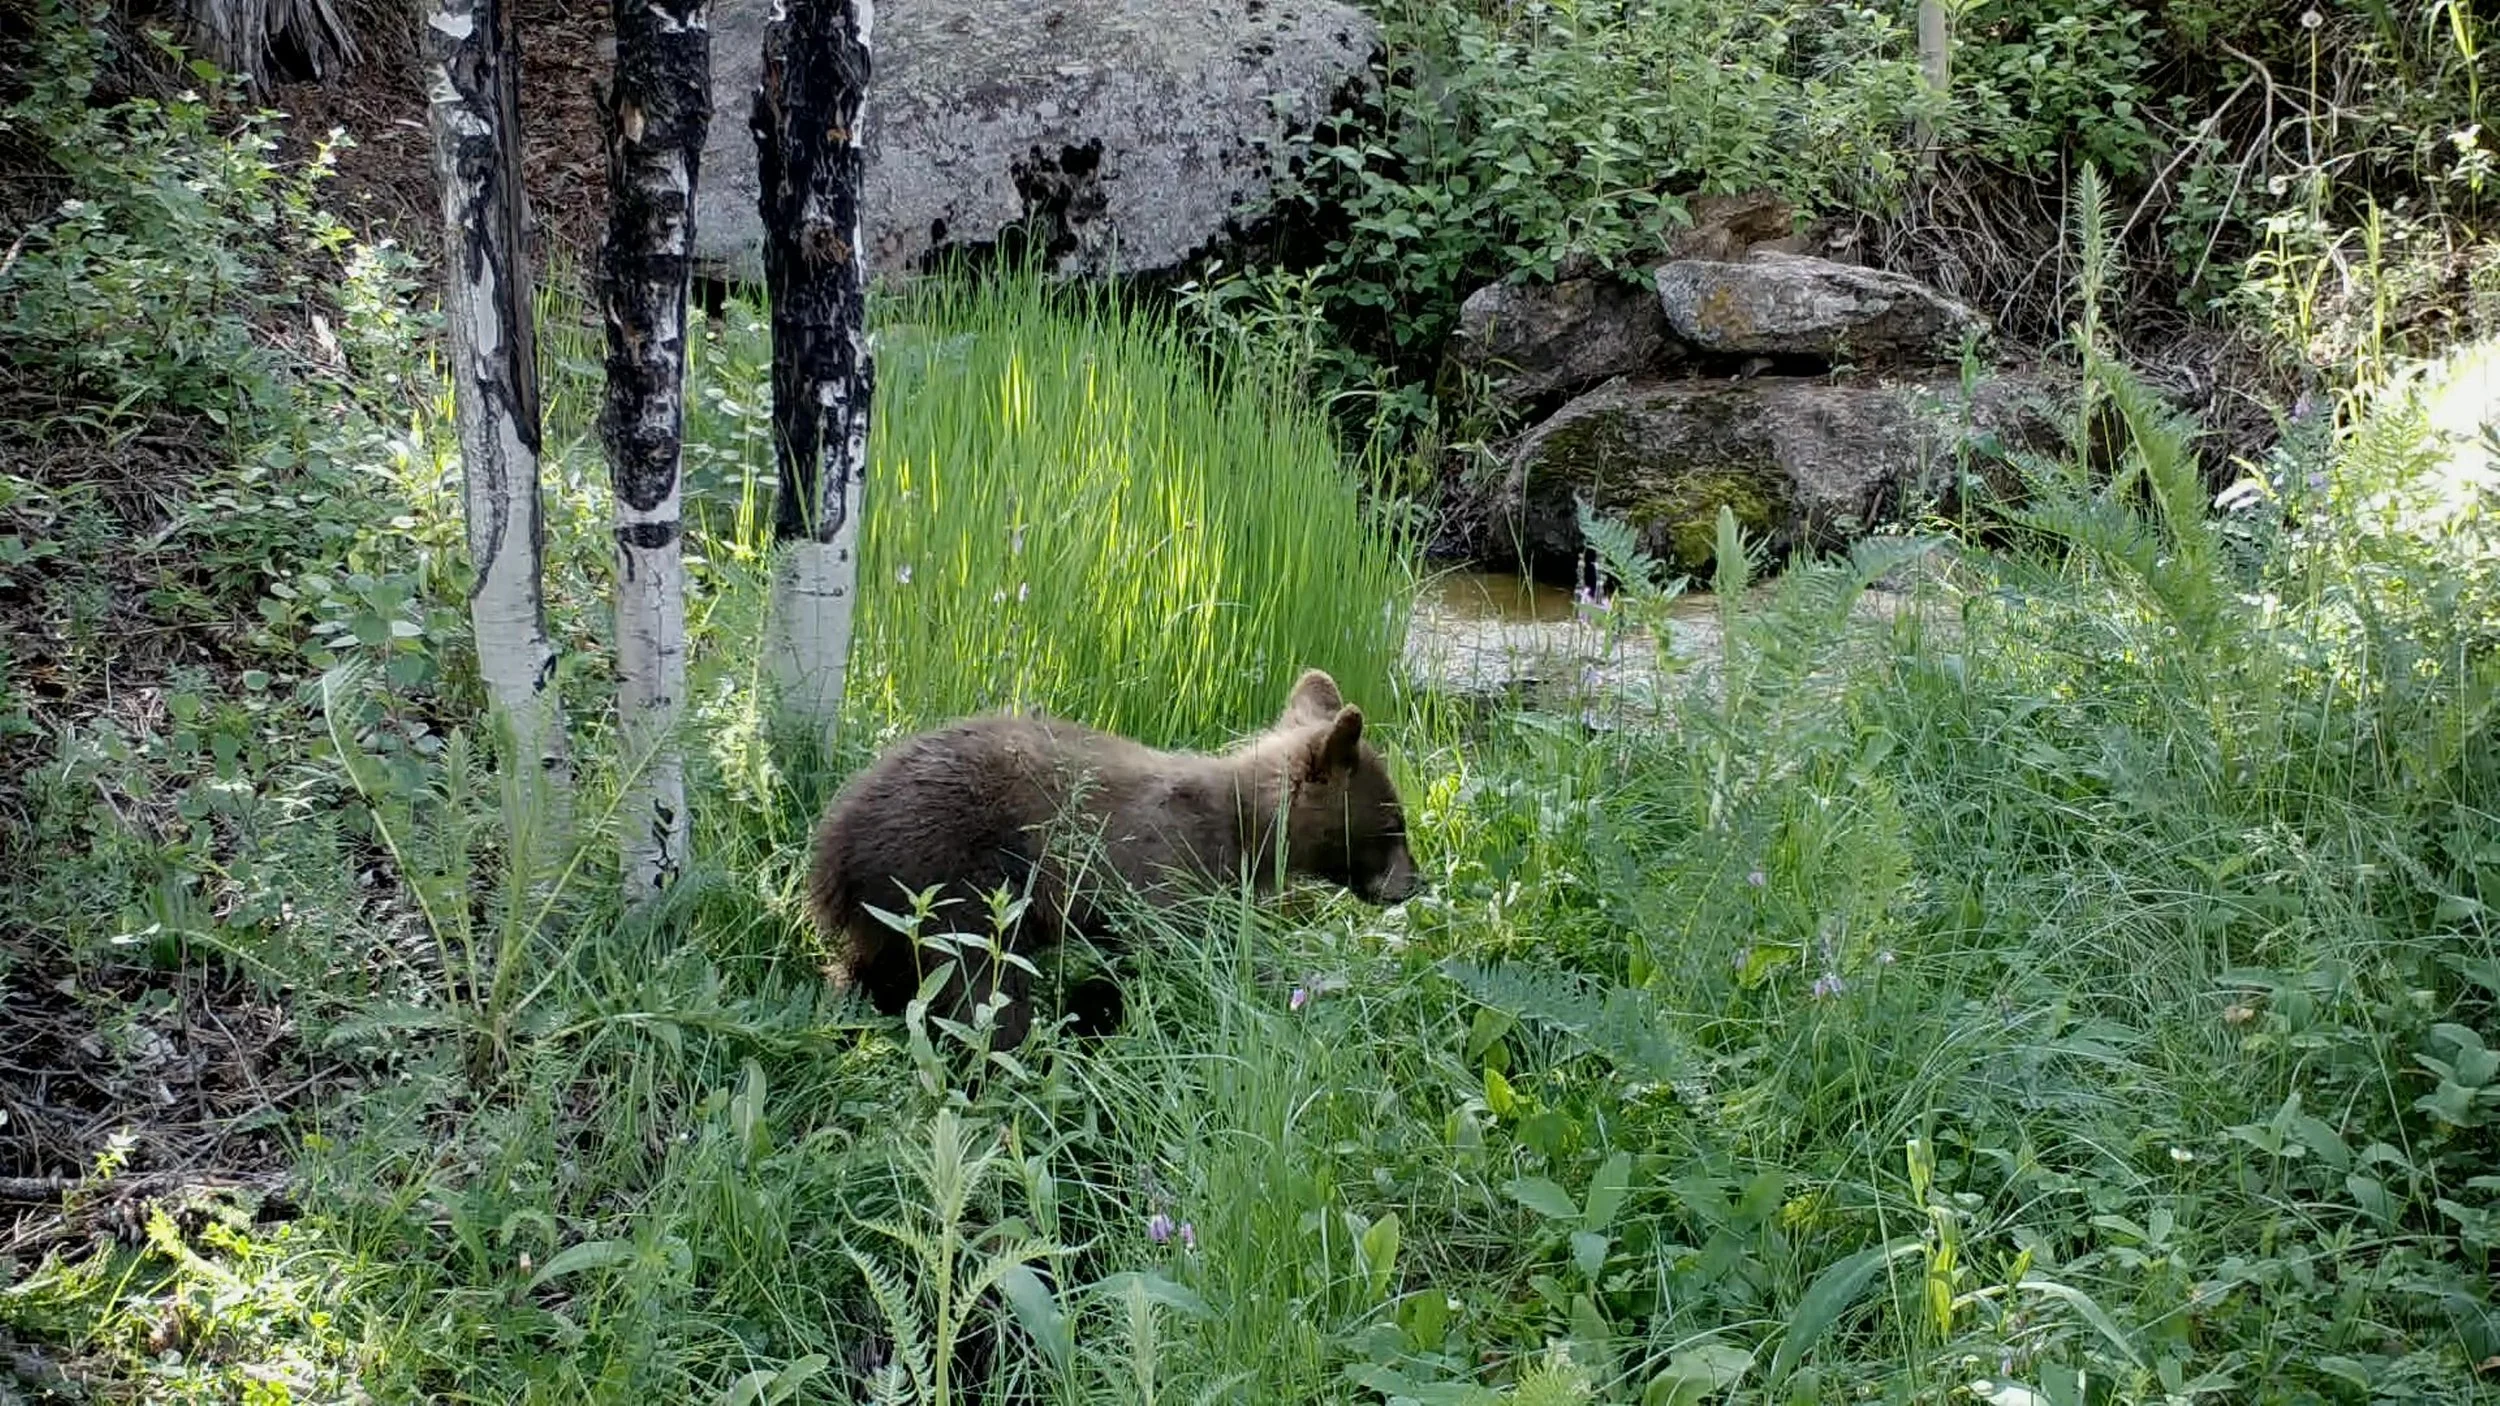
A black bear cub enjoying lush green grass and forbs far from human activity. In fact, there is a good chance this bear hasn’t seen a human being by this point.
Airflow Focus
Let us assume our interest lies in filming mountain lions, the great shadow cats of the American West. Though spoken of as elusive and ghostlike, this apex predator has proven to be one of the most predictable animals I have studied in a lifetime spent wandering wild country. Like flowing water seeking the path of least resistance, the mountain lion hunts through cover, threading itself through brush and broken timber, doing all it can to remain hidden from watchful prey, especially herds of deer or elk moving across the open slopes.
In preparation, I turn first to the wide, revealing eye of Google Earth, studying the land as one might read the grain of old wood or the lines of a well worn trail. I search for places where air currents remain as faithful as the turning of the Earth itself, steady and dependable through the full cycle of a 24 hour day. These favored places share a simple but powerful harmony, the cold air drainage and the dominant wind moving together as one, like twin currents in the same mountain stream.
When the prevailing wind comes out of the west, my search settles on valleys that rise higher on their western shoulders than on their eastern rims. In such country, the cold night air slips downhill from west to east, guided by gravity and terrain, moving in quiet agreement with the dominant wind above. This alignment creates a living pathway of scent, a river in the air that carries the story of every hoof and hide drifting before it.
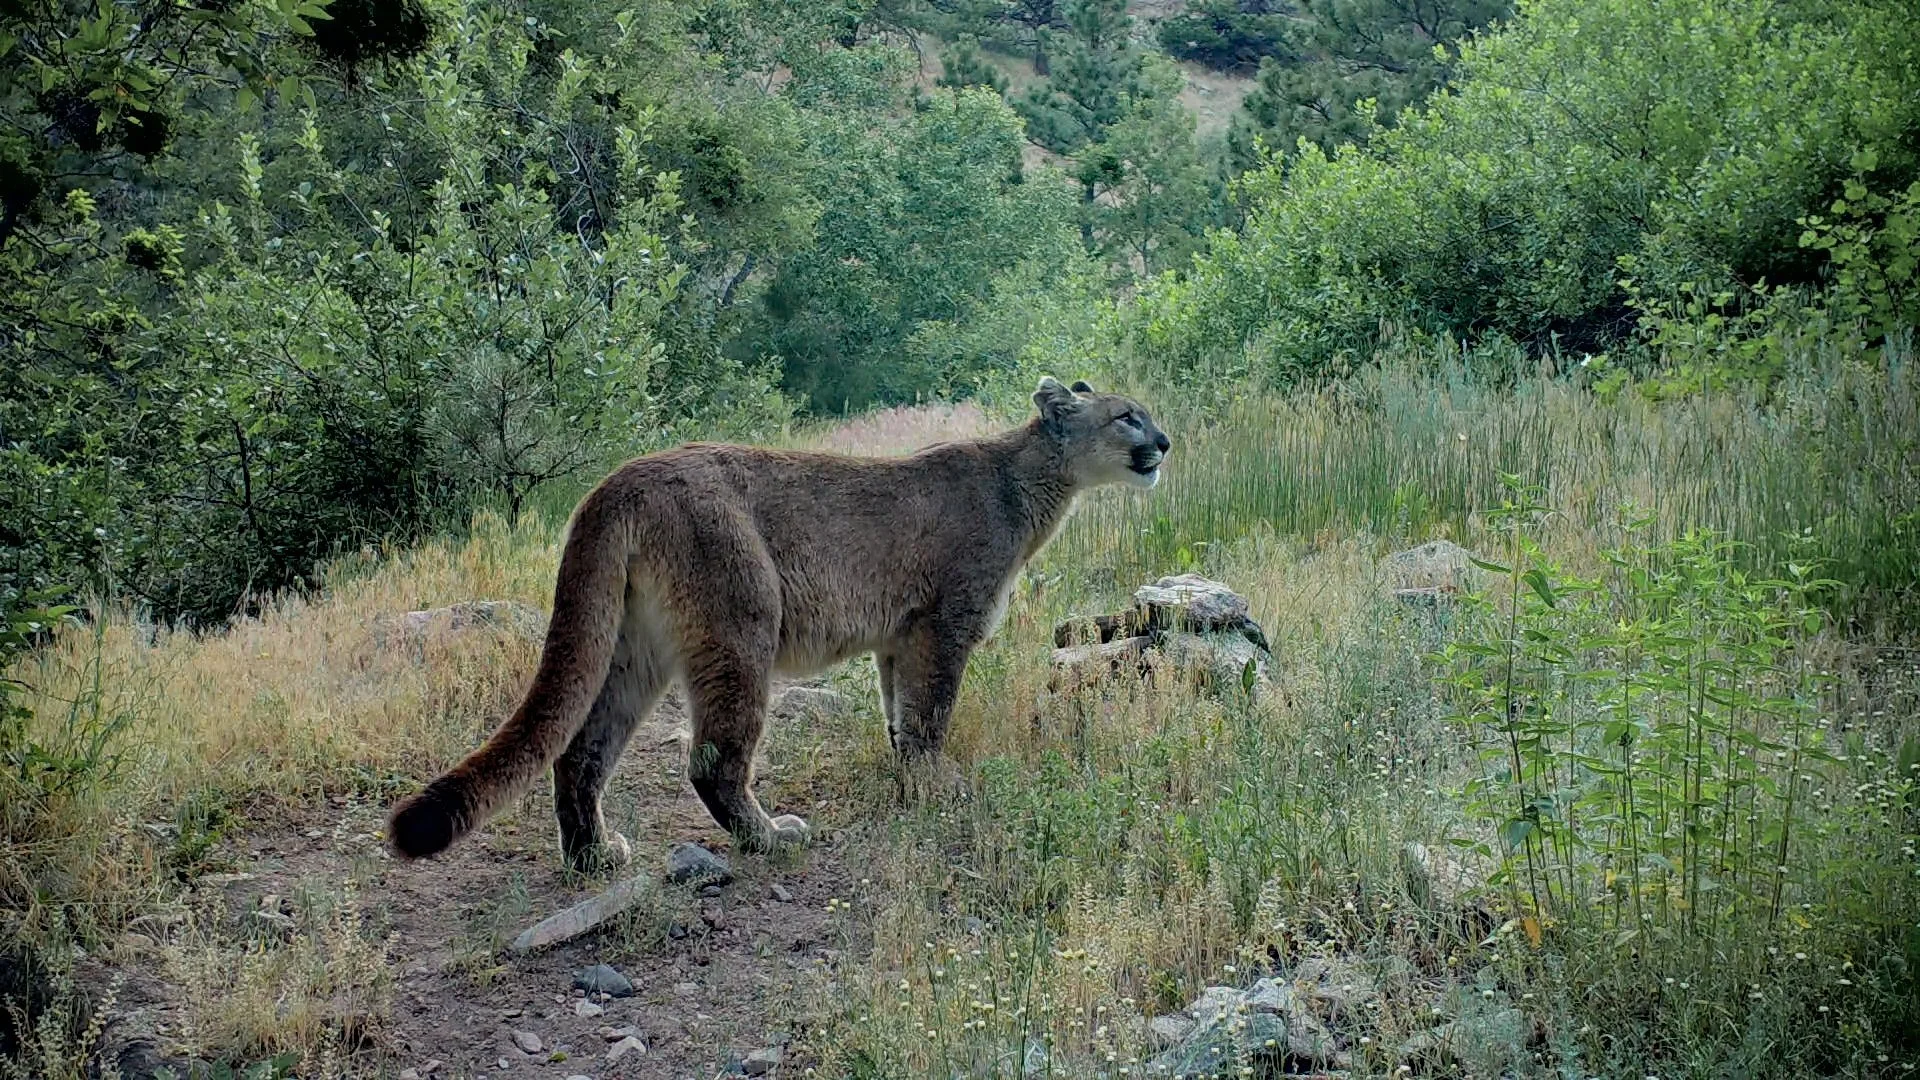
Female mountain lion moving up the trail into the cold air drainage.
After more than 22 years spent filming and studying mountain lions across canyons, ridges, and timbered draws, I have come to see that lions favor these valleys with remarkable consistency. They move into the wind as naturally as trout face the current, advancing with patience and purpose, choosing routes where the air delivers news of prey long before their silent paws touch the final stones of the hunt. In valleys that run against the wind, their movements grow less certain, but where wind and cold air travel together, the lion’s path becomes as predictable as the pull of gravity itself.
Camera Setup, Maximizing Quality
Filming completely wild mountain lions without using any lures, is something that took me years to figure out. There is no shortcut to learning what works and what fails when the subject is a predator that lives by caution and silence. I have always been a stickler for quality footage, not just for the sake of video itself, but for the ability to pull a single frame and turn it into a still image that carries the same power as a carefully composed photograph.
For years, I have relied on the Browning Recon Force line of cameras. My favorite, by far, is the Browning Recon Force Elite HP5. It records video at 1080p and 60 frames per second, and that combination produces stunning day and night footage, along with incredibly sharp still images pulled directly from the video frames. When everything comes together, the motion of a passing lion can be paused at just the right moment, revealing muscle, whisker, and expression in a way that feels immediate and alive. All of these images are from the Elite HP5 camera.
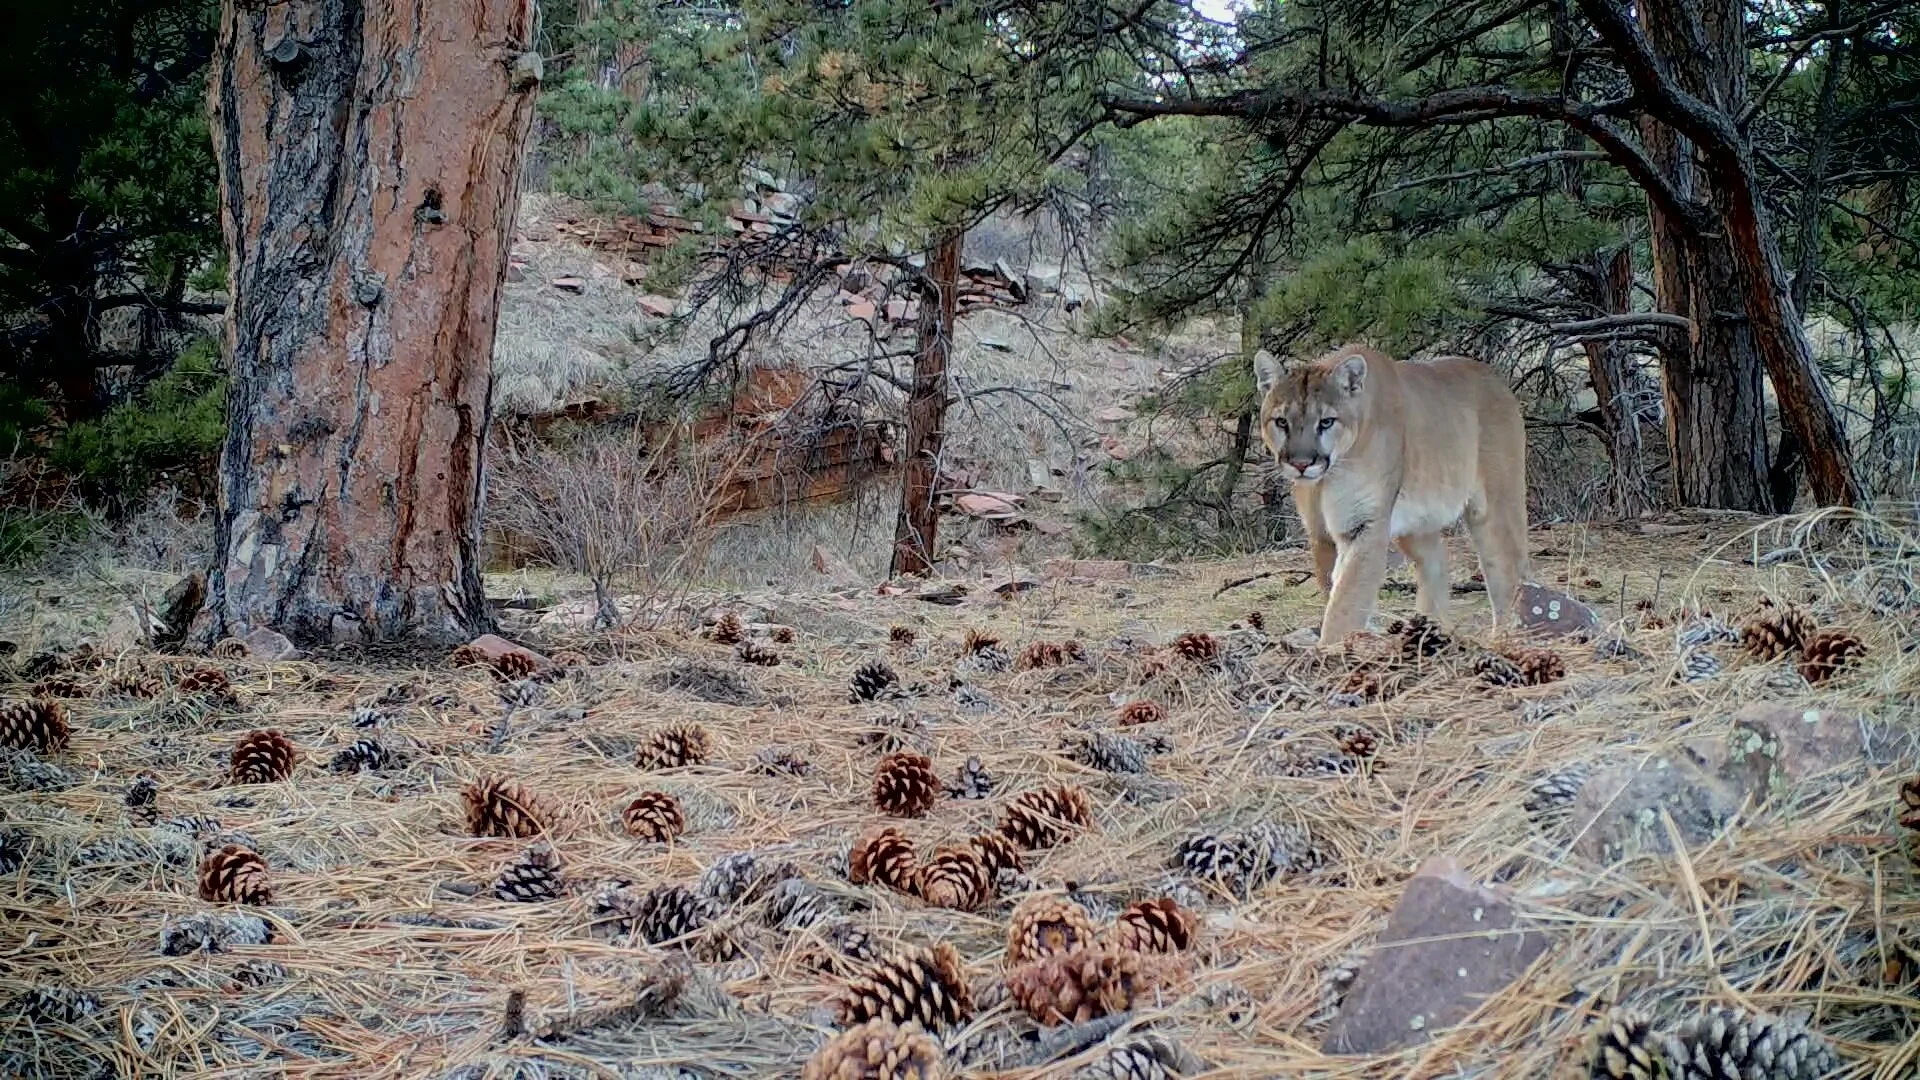
This lion was captured with a Browning Recon Force Elite HP5 camera on a tripod. There are a number of mountain lion scrapes in front of the tree and I wanted to capture the detail, including the pine cones.
Once a general or specific location has been chosen, the next step is to build the setup with intention. Over time, six priorities have proven themselves again and again, small details that make the difference between usable footage and something truly exceptional.
1. Set the camera height to match the internal organs of the animal you are interested in.
For mountain lions, that means setting the camera 13 to 15 inches off the ground, much lower than most people are comfortable with. The PIR sensor triggers using a combination of infrared heat and motion, and the heat signature is far stronger when the sensor sits at the same height as the animal’s internal organs. When the height is right, the camera responds faster and more reliably, capturing the full stride rather than the tail end of a passing animal.
2. When setting up on a wildlife trail, look for a section where the ground slopes up and away from the camera.
This detail is often overlooked, but it makes a measurable difference. A trail that rises slightly behind the animal places solid ground behind the body, providing terra firma that strengthens the heat signature and helps the PIR sensor detect movement more effectively. In practical terms, it means fewer missed opportunities when a lion passes through.
3. Point the camera between northeast and northwest whenever possible.
Direct sunlight striking the face of a camera creates glare, false triggers, and washed out footage. By angling the camera between NE and NW, you reduce the chance of the rising or setting sun interfering with image quality. The result is cleaner footage, more consistent exposure, and far fewer surprises when you return to review what was captured.
4. Use a level to ensure the horizon is straight before leaving the setup.
A tilted horizon is one of those mistakes that cannot be corrected later without sacrificing image quality. I use a bubble level on my phone, a simple tool that takes only seconds to check. It works remarkably well and saves hours of frustration when reviewing footage back at home.
5. In areas where camera theft is not a concern, consider using a small tripod with bendable legs.
This approach has produced many of my best videos. Place rocks on the tripod legs to hold everything firmly in place, then pile additional rocks or brush behind the camera to break up its outline. Many of my most compelling sequences have come from tripod setups where the camera sat less than eight inches off the ground, giving a perspective that feels natural, immersive, and close to the world the lion inhabits.
6. Clear the foreground with precision, but never disturb the natural feel of the area.
Small twigs, grass stems, and loose debris in front of the camera can trigger false recordings or blur the subject as it passes. I take a few quiet minutes to remove only what is necessary, leaving the rest of the setting intact. The goal is not to alter the trail, but to refine the camera’s view so that when the lion steps into frame, nothing stands between the lens and the story unfolding in front of it.
Keeping Track of Cameras
Cameras are expensive, and sometimes the footage they capture is truly priceless. A single sequence of a mountain lion moving naturally through its world can never be recreated, never staged, and never recovered if it is lost. With dozens of cameras spread across miles of rough country, I learned over time that keeping track of each one requires discipline, consistency, and a system that leaves nothing to chance.
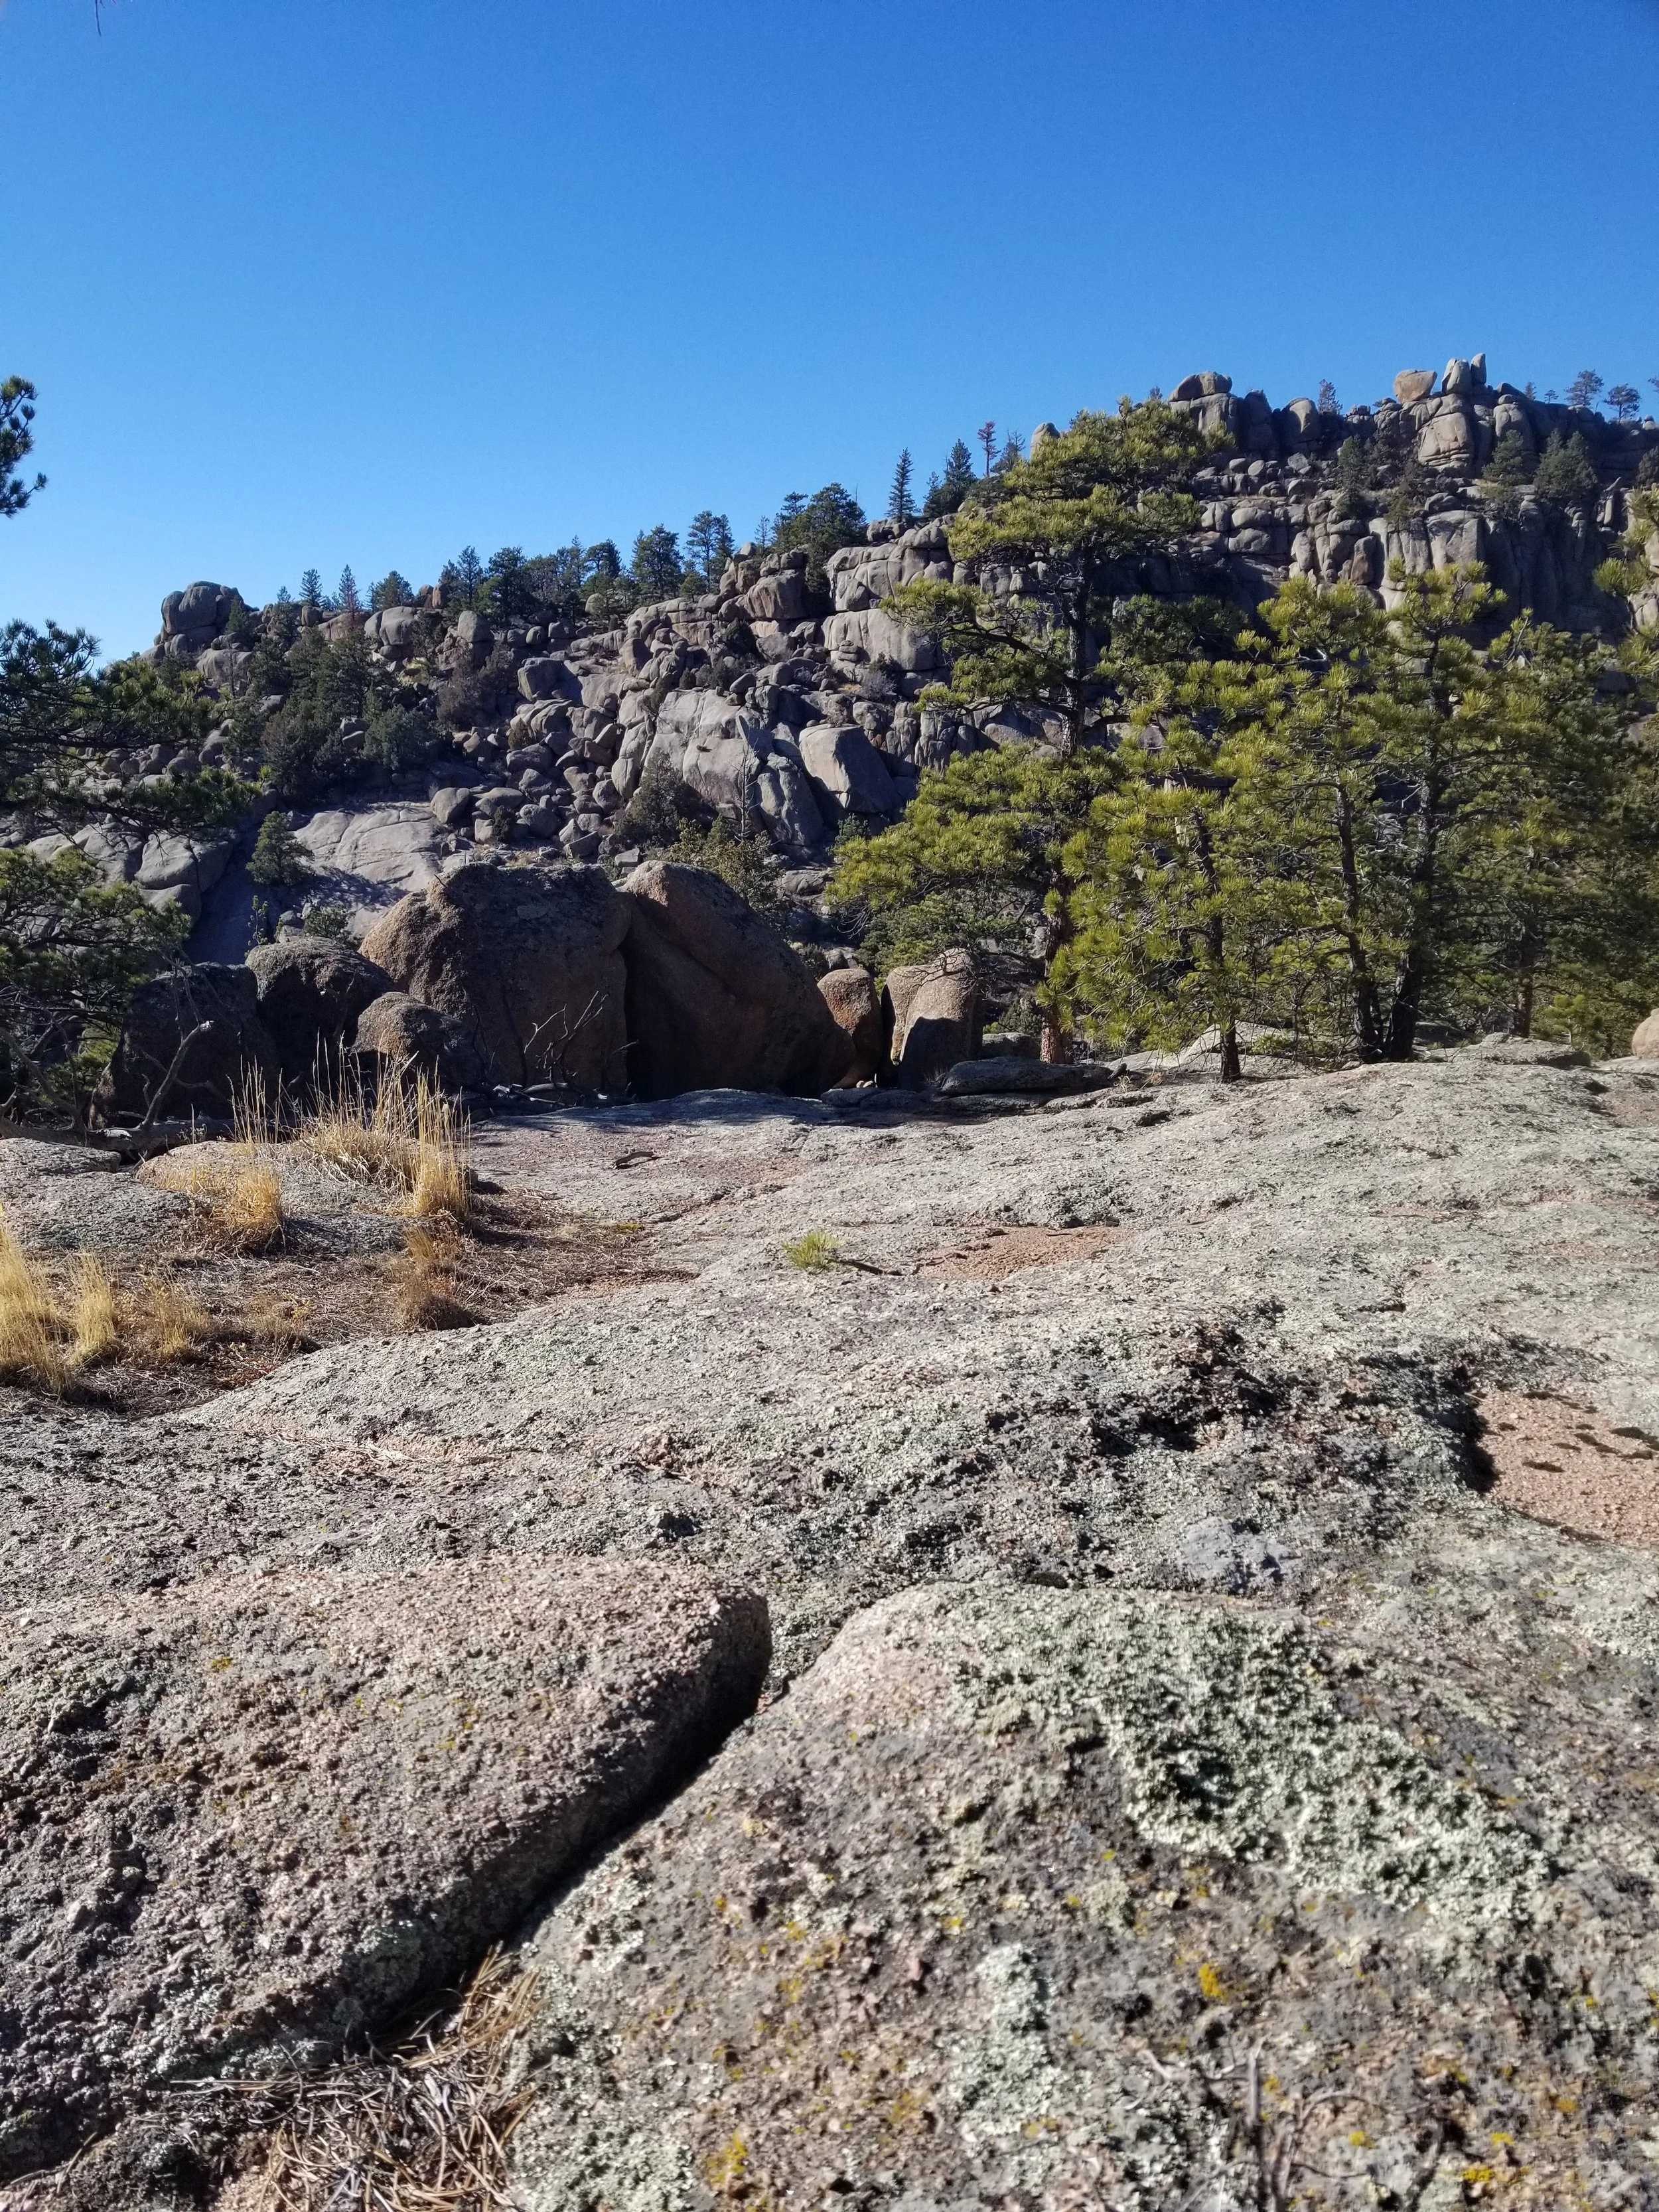
Waypoint image of the view the camera has. I set the camera up six weeks ago and those ponderosa pine trees blowing in the wind may cause false triggers. This image reminds me I’d better get back there soon as the SD card may be full.
The method I rely on today grew out of necessity. In the early years, I trusted memory more than I should have, and wild country has a way of humbling anyone who believes they can remember every tree, every bend in a trail, every hidden setup tucked against rock and timber. Eventually, I settled on a system that not only keeps track of each camera, but also preserves valuable information about how every setup was built.
I use the mobile app GaiaGPS on my phone to set waypoints for each camera location. Each waypoint is paired with photos, and I capture two images for every single setup. These images serve as a visual memory, allowing me to return weeks or months later and understand exactly how the camera was positioned, what the field of view looked like, and how the surrounding terrain shaped the final footage.
The first waypoint photo is captured by setting my cell phone camera to a five or ten second timer. This gives me enough time to press the shutter button and carefully place the phone on top of my trail camera or DSLR camera trap. When the timer finishes, the phone captures the exact view the camera sees, the same perspective that will record the passing of wildlife. This image becomes a reference point, a frozen moment that shows the intended framing and composition of the setup.
Next, I step back twelve or fifteen feet and take a second photo of the camera itself. This image is just as valuable as the first. It reminds me how the camera was mounted, how it was blended into the landscape, and what materials were used to break up its outline. When reviewing footage later, this second image helps explain success or failure. If the results are not what I expected, I can study the photo and make small adjustments on the next visit. And when a big snowstorm is on the way, especially if a camera is positioned close to the ground, this image reminds me which setups may need to be raised to keep them from being buried beneath fresh snow.
Each waypoint image is saved using a specific camera name. Over time, this naming system becomes an organized record of activity in the field. I can sort the list of cameras by name or by date, allowing me to quickly see which cameras have gone too long without being checked. It removes guesswork and replaces it with clear, reliable information.
With this system in place, I never lose a camera. Just as important, I never lose the story behind the setup. Every waypoint becomes a quiet marker in the landscape, a reminder of time spent studying the land, learning its patterns, and preparing for the rare and fleeting moment when a mountain lion steps silently into view.
Additional Tips
Over the years, a handful of practical lessons have saved me more time in the field than I can measure, and more money than I care to admit. These are not complicated ideas, but each one was learned through trial, error, and long miles walked back into wild country to correct something that could have been done right the first time. When cameras are spread across rugged terrain and time in the field is limited, efficiency becomes just as important as creativity.
1. Use AA rechargeable lithium batteries whenever possible.
Reliable power is the backbone of any long term camera setup. I use AA rechargeable lithium batteries, and the brand I have come to trust most is Hixon. These batteries hold more power than disposable Energizer Lithium batteries, and they can be recharged up to 1500 times. By the third recharge, you are essentially working with free batteries, and that adds up quickly when running multiple cameras across the landscape.
In my experience, I can get three to five months of use between charges, depending on activity levels and weather conditions. That kind of longevity saves both money and time in the field. Most of my camera checks become simple and efficient, swapping the SD card, cleaning the lens, and making any small adjustments needed to improve the setup. Avoiding frequent battery changes is an enormous time saver, especially when cameras are tucked into steep or remote terrain.
2. Use two cameras set at a 90 degree angle to improve night video quality.
Lighting makes all the difference when filming animals after dark. By placing a second camera at roughly a 90 degree angle to the first, the additional infrared light helps illuminate the subject from the side. This added light reveals muscle definition and body contours that would otherwise be lost in flat lighting from a single source.
There is one detail that must be followed carefully, the first camera should never be able to see the second camera. If it does, the footage will capture the source of the infrared light, creating distracting glare and unwanted highlights in the frame. With proper placement, however, the results can be remarkable, producing night footage that shows the power and movement of a mountain lion in striking detail.
3. Use VLC Media Player to capture still images from video frames.
Once the footage is collected, the real reward often comes from pulling still images that reveal moments invisible to the naked eye. I use the free VLC Media Player to capture still images directly from video frames, saving them in JPEG format. These extracted images are often far superior to images captured in still photo mode on the trail camera.
Video allows you to select the exact frame where posture, lighting, and motion come together perfectly. A passing lion might offer dozens of usable frames within a few seconds of footage, and choosing the right one makes all the difference between an average image and something worth sharing or printing.
4. Repaint cameras when the original finish begins to fade.
Camouflage is not permanent. Over time, the paint on a trail camera begins to lighten due to oxidation, making it more visible against the darker tones of bark, soil, and stone. When that happens, I repaint the camera using Rustoleum camouflage paint and a small foam brush.
Rather than spraying directly onto the camera, I spray a small amount of paint into the corner of a plastic bowl, then quickly apply it with the foam brush. This gives better control and avoids heavy buildup. I use a combination of dark brown and two shades of green, blending the colors in irregular patterns. When finished, the camera blends naturally into its surroundings and all but disappears against the landscape.
These small details, repeated over years in the field, have made the difference between frustration and consistency. When equipment is dependable, well placed, and carefully maintained, it fades into the background, leaving only the wild rhythm of the land and the quiet passage of the animals that move through it.